
Technical Tip
If you only have one warehouse, or if all warehouses use the same GL interface records and T1 and T2 accounts, you set these on the Supplier Update screen - Supplier tab (refer to "File - Supplier - Supplier").
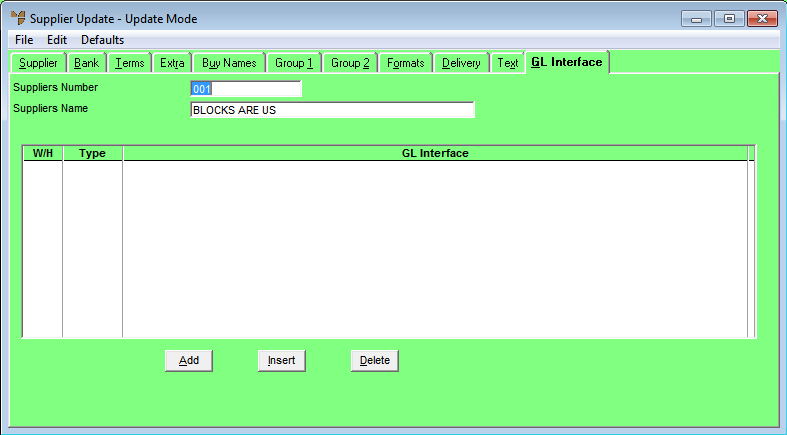
Use this tab if you have different warehouses setup and you want to set different default GL interface records and T1 and T2 accounts for a supplier for each warehouse. These entries default when users process goods receipts and import costing batches.
|
|
|
Technical Tip If you only have one warehouse, or if all warehouses use the same GL interface records and T1 and T2 accounts, you set these on the Supplier Update screen - Supplier tab (refer to "File - Supplier - Supplier"). |
To set different GL interface records and T accounts for a supplier for different warehouses:
Refer to "Adding a New Supplier" or "Updating a Supplier".
Micronet displays the Supplier Update screen - GL Interface tab.
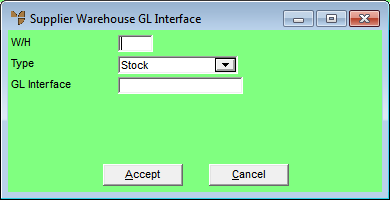
If you selected to add, insert or edit GL interface settings for a warehouse, Micronet displays the Supplier Warehouse GL Interface screen.
|
|
Field |
Value |
|---|---|---|
|
|
W/H |
Enter the ID of the warehouse to which these GL interface settings apply. You can also press Tab or Enter to select a warehouse. |
|
|
Type |
Select the type of transactions to which these settings apply. Options are:
|
|
|
GL Interface |
Enter the name of the default GL interface record for purchases from this supplier for this warehouse. This interface defaults when completing goods receipts or import costing for this warehouse. Press Tab or Enter to select a GL interface. For more information on GL interface records, refer to "Setting up Micronet Integration". |
|
|
T1 Account |
If you are using T accounting within MGL, enter the default T1 account for this supplier for this warehouse. You can also press spacebar then Enter to select a T1 account. |
|
|
T2 Account |
If you are using T accounting within MGL, enter the default T2 account for this supplier for this warehouse. You can also press spacebar then Enter to select a T2 account. |
Micronet redisplays the Supplier Warehouse GL Interface screen for you to add GL interface settings for another warehouse.
Micronet redisplays the Supplier Update screen - GL Interface tab.
For more information, refer to "Supplier Update Screen - Menu Options".